Thursday, August 27, 2009

Guideline: HowTo Connect Laptop/PC to LCD TV (Part 3/3)...


Laptop-TO-LCD TV Hands-on Example:

I am going to connect the following laptop and LCD TV:
1. Compaq Presario (Model: CQ50 115NR).
2. Samsung 40in LCD TV (Model: LN40A550).

Note: The example setup I am going to show would follow the same steps, as if I were connecting the LCD TV to a desktop computer.

The laptop uses a NVIDIA GeForce 8200M G graphics card and is running MS Windows Vista Home Edition (32-bit). Also, the laptop has only a VGA output port (no HDMI, DVI or S-Video ports). Since my cable connection options are limited, I am going to use a D-SUB cable to connect the Samsung LCD TV to the Compaq Presario laptop.


Image 1: Compaq Presario Laptop


Image 2: Samsung 40" LCD TV


First, I verified that my graphics card driver was up-to-date.


Image 3: LCD TV Rear Panel


I powered down my laptop and turned off the TV. I then physically connected the laptop and TV using the D-Sub cable.


Image 4: VGA Cable connected to LCD TV Rear Panel


Next, I used a 6 ft 3.5mm mini-stereo audio cable for the audio connection. I plugged one end into the audio jack on the TV and the other end into the headphones jack on the front of the laptop.


Image 5: VGA Cable connected to Laptop


I turned on the TV and using the TV Input button on my remote changed the source input to PC.


Image 6: TV Input Changed to PC option

Next, I powered up my laptop and the login screen immediately appeared on the LCD TV as well as the laptop. Surprisingly, the clarity of the Windows Desktop on the LCD TV was remarkably good, without any adjustments. Also, there was no over- or under-scanning.

After I logged on to the laptop, a popup window stated that the system had detected another display and it gave me options for configuring my displays. It allowed me to set the NVIDIA nView display mode to use:
1. Only use one display (Single).
2. The same on both displays (Clone).
3. Configured independently from each other (DualView).

I applied option three. My laptop display is set as primary and the Samsung display defaults as secondary. See Figure 1 below. [Click on image to enlarge].


Figure 1: Setup Multiple Displays

I brought up the NVIDIA Control Panel and verified that the Refresh Rate was set to 60 Hertz. Also, the laptop display resolution is set to the native (maximum) value of 1200x800 and the LCD TV display resolution of 1920x1080. See Figure 2 below. [Click on image to enlarge].


Figure 2: Resolution

As configured now, the dual display setup works well. I ran a few applications on both displays and it is great!

Below is a screenshot of the laptop desktop (left) and LCD TV display (right). The LCD TV displays the Windows Media Player application running in full screen mode. [Click on image to enlarge].


Image 7: Laptop and LCD TV Screen shots

I think that has to be one of the best system configurations to run smoothly for me, without any major troubleshooting.


Previous>>

___

Tuesday, August 25, 2009

Guideline: HowTo Connect Laptop/PC to LCD TV (Part 2/3)...


Cable Connection Setup

There may be more than one way for you to hookup your laptop/PC to the TV, based on the information discussed in the previous posting on Cable connections. However, I am going to take a look at two of the more popular ones:

1. HDMI/DVI Connection.
2. VGA Connection.

Before proceeding with the discussion of these two approaches, I want to state the following:
1. That the graphics card on your laptop/PC has the lastest driver installed. [If not, use the Device Manager in the Windows Control Panel to access the card and update its device driver].
2. That it is assumed that both your laptop/PC and LCD TV are powered off, before you start connecting cables.
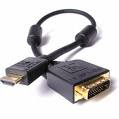
HDMI/DVI Cable Connection
Today, HDMI ports are very common on LCD TVs, but less common on your Laptop/PC up until recently. Therefore, many people use a HDMI/DVI connection between their laptop/PC and their LCD TV. That is, a HDMI/DVI cable (see image below), is used to connect to a HDMI port on the TV end and to a DVI Port on the laptop/PC side.


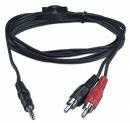
Since a HDMI/Cable only carries a video signal, we will also need a 3.5mm mini-stereo-to-RCA cable (as shown below).


Moving on...

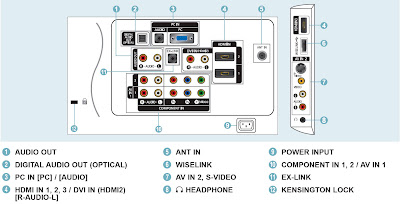
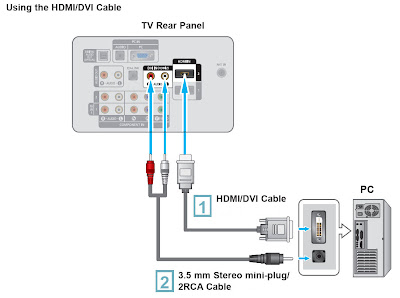
First, let's take a look at the connection panel of a typical LCD TV. The schematic below will be somewhat similiar to the one for your LCD TV [Click on the image to enlarge]. Nowadays, a LCD TV comes with the cable connections described in the previous section (i.e. HDMI, S-Video, VGA, RCA, etc.).

For the purposes of describing the HDMI/DVI Connection setup, we are interested in the HDMI2 port (labelled # 4).


Step 1: Connect the HDMI/DVI cable between the HDMI IN 2 port on the TV and the DVI output port on your computer.
Step 2: Connect the 3.5 mm Stereo mini-plug/2RCA Cable between the DVI IN(HDMI2) [R-AUDIO-L] port on the TV and the Audio Out jack of the on your Laptop/PC.

Note: This is not an option if your laptop/PC does not have a DVI output port.

Look at the schematic below [Click on the image to enlarge]:


Fairly simple to connect, eh? However, there some display settings (laptop/PC and LCD TV), that we need to cover in order for this to work properly. This discussion is at the end of this post below.
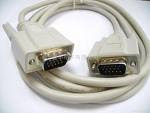
VGA Cable Connection
All laptops/PCs come with a VGA connection and so do the LCD TVs. For the purposes of hooking up the laptop/PC to the TV, we will need a D Sub cable that has male VGA connectors at both ends (as shown below).


Step 1: 
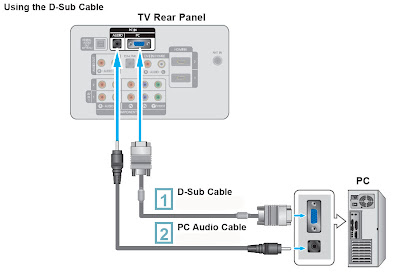
Connect a D-Sub Cable between PC IN [VGA] connector on the TV and the VGA output port on your laptop/PC.
Step 2: Connect a mini Audio Cable between the PC IN [AUDIO] jack on the TV and the Audio Out jack on your laptop/PC.

Look at the schematic below:


Again, fairly straight-forward. Now, in the subsection below, we will discuss what laptop/PC and TV settings need adjustment or modification, so we can complete the connection setup.

Laptop/PC and LCD TV Settings
Regardless of the type of cables you use to physically connect your laptop/PC to your LCD TV, there are some settings on both the laptop/PC and LCD TV ends that are required for this connection to work properly. Due to the variety of laptops/PCs and LCD TVs, the setting adjustments will vary slightly. However, I am going to give a general description of these settings.

First, turn on your LCD TV and then power up the laptop/PC. The laptop/PC should come up in the usual way with the Windows Desktop displayed. However, the LCD TV may have a blank screen or is tuned to one of your regular TV channels.

We must first change the source input for the LCD TV by using the TV INPUT button on your TV remote or the button on the actual TV itself. By scrolling down through the options, select the input option as follows:

  • For the HDMI/DVI connection, choose HDMI2.
  • For the VGA connection, choose PC (possibly listed as VGA).

After making this switch, the Windows Desktop may or may not be displayed on your LCD TV. Don't worry if it is not displayed at this stage, as we have to make further display setting adjustments on the laptop/PC.

Typically, most laptops/PCs have one of the following types of graphics cards:
  • Nvidia Graphics Card.
  • ATI Graphics Card.
  • Intel Graphics Card.


Anyways, we need to bring up the Control Panel interface*, for the particular graphics card installed in the laptop/PC and make the following adjustments:
1. Setup for multiple displays.
2. Resolution and Refresh Rate.

*Note: In Windows XP/Vista, the Control panel can be brought up by doing a right-click of the mouse button on the Desktop area and choosing the Control Panel from the menu listings.


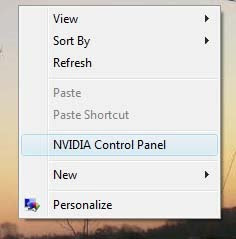
Figure 1: NVIDIA Control Panel Selection

Please note at this stage, your laptop/PC may have already automatically detected and adjusted the resolution for the new LCD TV display. Regardless, the laptop/PC-to-TV connection may have resulted in over-scanning (where the Windows screen goes beyond the TV screen) or under-scanning (where the Windows screen is much smaller that the TV screen). There are setting options in the Control Panel that will allow you to compensate for over- or under-scanning.

Next, we want to setup how we use the two displays (laptop/PC and the LCD TV). Typically, we use one of the following:
1. Clone (this option mirrors your Windows desktop on the LCD TV display). It is a good option when you are using your TV as a display for presentations.
2. DualView (this option extends your Windows Desktop desktop display area to the newly connected TV). It is a good option to use for playing DVDs, or watching online TV, as you can still you use your laptop/PC for other computer tasks and at the same time, your Media Player can be running on the TV display.

Again, there are setting options in the Control Panel for this setup.


The Refresh Rate should be set to 60 Hertz. At this time, a rate greater than 60 Hz may cause damage to your LCD TV screen. However, I am aware that some of the new LCD TVs coming on the market now, can accommodate refresh rates up to 120 Hertz.

Next, the resolution on your LCD TV maybe out of whack and that the TV display is not that clear or has a view that is not nice for the eyes. If this is the case, you will need to do some resolution adjustments (also, an option in the Control Panel).

Disclaimer: Some further minor adjustments maybe be required for your specific laptop/PC-to-TV setup, but this is only a general guide. You should consult your LCD TV manual and graphics card manual for further tweaking of the settings.

At this point, you should have an acceptable display on your LCD TV. If not, then unfortuantely, you will have to do some troubleshooting. I don't have any specific troubleshooting tips right now, but as I come across some I will add them to the Troubleshooting Tips section below.

Troubleshooting Tips

To be added.

Part 3 of this posting covers my actual experience(s) of connecting my laptop to the LCD TV.

HowTo Guideline Part 3/3>>

Previous>>

___

Guideline: HowTo Connect Laptop/PC to LCD TV (Part 1/3)...


Overview
There are numerous benefits and reasons why you would want to connect your laptop/PC to your LCD TV. You can use your favorite music program to play your favorite tunes, show all of your digital photos or videos to your family, and even show a PowerPoint presentation to coworkers. Combining the laptop/PC with your LCD TV allows possibilities for the easy chair, that were once limited to the office chair.

In the following posts, I provide some information on connecting a laptop/PC to LCD TV. The information provided is not new and is available at many other sites. However, in addition to discussing some of the guidelines to performing the task of a laptop/PC to TV hookup, I finish the discussion with my experience of hooking up my laptop to a LCD TV.

There are three primary steps to performing the task at hand:
1. Identifying the available connections on both the laptop/PC and the TV.
2. Choosing a compatible connection and performing the actual physical connection.
3. Performing modifications to the Display setting on the laptop/PC and LCD TV, that will allowed what's on the computer to be viewed on the TV.

First, let's take a look at some background information in cable connections...

Cable Connection Methods to connect a laptop or PC to your LCD TV

The following is a list of the different types of cables/connections you will have to choose from with picture quality ranging from highest to lowest:

1. HDMI – "High Definition Multimedia Interface" or HDMI is the highest quality connection now. All HDTVs will have this connection though chances are your laptop or computer may not. If you do happen to have an HDMI connection on your computer then by all means, use this connection. Using HDMI will give you the best quality by far. Many of the newer computers have HDMI ports. If your PC/Laptop doesn't have one, you can get a HDMI-to-DVI cable to connect it to your LCD TV. HDMI is compatible with DVI.


2. DVI stands for "Digital Video Interface" and has pretty much been the standard for connecting computer monitors since about 2003. Your computer will most likely have this connection. HDTVs should also have this connection. If you wish to use audio with a DVI connection you must use a seperate audio cable. The digital signal will give a higher quality picture than either S-Video or VGA. Of course, your computer will need to have a DVI connection and your TV will need to be an HDTV.


3. VGA or "Video Graphics Array" connections are the most common video connections found on laptops and PC’s. HDTVs may have a VGA connection which means you simply need to connect the cable between your computer and television. However, older televisions will not have a VGA connection and will require a PC to television converter. There are USB converters that allow you to use this method. Just like DVI, VGA does not carry an audio signal. It gives much better quality than S-Video. You usually won’t find a VGA port on regular TV’s though, so this option is if you have an HDTV.


4. S-Video or "Super Video" has been around for quite some time now. Some laptops and computer graphics cards will have a S-Video connection. Most televisions will also have a S-Video connection. This isn’t the best quality connection but its also not the lowest quality. S-video has the same audio limitation as the above DVI and VGA examples. Remember, there are two types of S-Video cables: 4-pin and 7-pin. Most laptops and PC’s are equipped with a 7-pin port, so if your TV only has a 4-pin S-Video port, then this method will not work.


5. RCA - RCA connections also known as Composite connections, are the yellow, red, and white connections that most people will be familiar with. Red is right analog audio, and white is left analog audio. Yellow is composite video. This will be the lowest quality connection to use. If your computer has no RCA connections, you can use an RCA to S-Video cable.

In part 2 of this guideline, I am going to discuss cable connection hookup based on two of the Cable connection options described above.

HowTo Guideline Part 2/3>>

___